# Endpoints
This page describes use cases and endpoints around the anybill Partner Platform API. The Partner Platform API is used to allow integrations with third party partners in multiple use cases.
[User Endpoints](#user-endpoints)
* Receive receipts in frontend application (Mobile, Web)
* Receive receipts by loyalty/customer cards
* Link user base with anybill accounts
[Onboarding Endpoints](#onboarding-endpoints)
* Automatic onboarding of customers/merchants within the POS system
* Check onboarding status of customers/merchants from the POS system
[Receipt Endpoints](#receipt-endpoints)
* Retrieve list of user receipts with minimal receipt information in combination with the [Receipt Notification Webhook](../webhooks/receipt_notification.md))
* Generate PDF for user receipt
* Add anonymous receipt to user
## User Endpoints
To enable your users to access their anybill receipts in the anybill Frontend SDK without the need for them to create dedicated anybill accounts, our anybill Partner Platform API offers a convenient solution.
These anonymous anybill users enable the interaction with our anybill Frontend SDKs, which encompasses the core functionalities of our platform, including the ability to add, receive and manage bills and perform various other essential tasks.
### Basic Workflow
Internally anybill always stores both an `anybillUserId` and an `externalId` for every user. The two integration variants below therefore differ only in *how* that user record is created, not in which id is used afterwards. Pick the one that fits your system:
**Option A - Implicit user creation via `externalId` (recommended).** You do not have to create an anybill user up front and you do not have to persist an `anybillUserId` alongside your own user record. Pass an identifier from your own system (for example a customer number, card number or user id) as `externalId` when requesting the token. The anybill user is created on the first receipt that is sent with the same `externalId` via the [Vendor API bill endpoint](https://developer.anybill.de/vendor_api/api_vendor.html#user-identification). The token endpoint itself does **not** create a user; it returns HTTP 404 until a matching user exists.
> **Tip: Activation required**
> The implicit flow has to be enabled per tenant on the anybill side. If `POST /v3/user/token` with `externalId` keeps returning 404 even after receipts with that id have been sent via the Vendor API, please contact `dev@anybill.de` so we can enable the feature for your account.
**Option B - Explicit user creation via `POST /v3/user`.** If you want to manage the anybill user life cycle explicitly - for example because you want to pre-register users before their first receipt, or run explicit user management operations - create the user first via the `POST /v3/user` endpoint, store the returned `userId` alongside your own user record, and use that id to request tokens and call other user-scoped endpoints.
In both cases the workflow ends with the same step: forward the token information to your frontend application and initialise the anybill Frontend SDK with it.

### Request a token (recommended)
Use the `POST /v3/user/token` [endpoint](https://partner-platform.anybill.de/api/swagger/index.html#/User/post_v3_user_token) to obtain an SDK token. Pass either an `externalId` from your system (Option A) or an `anybillUserId` if you have already created an anybill user via Option B. Exactly one of the two must be provided. The endpoint does not create users itself - it returns HTTP 404 for an `externalId` that is not yet known to anybill.
**Request**
```
POST /v3/user/token
```
```json
{
"externalId": ""
}
```
Alternatively:
```json
{
"userId": "9632d033-b25d-47c0-8aa9-85babec64969"
}
```
The optional `applicationClientId` can be added to both variants (see the note in *Retrieving token information for an anybill account* below).
**Response**
```json
{
"id": "9632d033-b25d-47c0-8aa9-85babec64969",
"accessToken": "string",
"refreshToken": "string",
"expiresIn": "string"
}
```
`id` is the anybill user id that is associated with the `externalId` (or the one you passed in directly). It is useful if you later want to call user-scoped endpoints that still take a `userId`.
> **Tip: First call after user creation**
> If the very first token call happens immediately after the underlying anybill user is created (for example right after the first receipt with that `externalId` arrived via the Vendor API, or right after `POST /v3/user`), it can occasionally take up to one minute until the user is accessible. In that case the endpoint returns HTTP 404 with `ProblemDetails.Type = "user-temporarily-not-available"`. Implement a short retry for this specific case.
>
> Note: If you use Option A and call the token endpoint *before* any receipt with the `externalId` has been sent, you will also receive HTTP 404 - permanently, until the first receipt creates the user. This is expected behaviour, not a transient error.
### Create an anonymous account (optional)
This step is **optional**. You only need it if you want to manage the anybill user yourself (Option B) - for example because you want to pre-register users before their first receipt, or because you want to run explicit user management operations against a known `userId`.
To create an anonymous anybill account call the `POST /v3/user` [endpoint](https://partner-platform.anybill.de/api/swagger/index.html#/User/post_v3_user).
To enable the automatic receival of receipts by scanning a customer or loyalty card, an identifier has to be provided during user creation as `externalId`. This identifier can be any type of ID (e.g. customer number, card number, userId, e-mail)
> **Warning: Identifier**
> * The identifier has to be unique within your organization
> * The identifier has to be present at the Point of Sale either by being scanned directly or by a Backend Integration between your organisation and the POS (for receipt receival with loyalty cards)
**Request**
``` json
{
"externalId": ""
}
```
**Response**
``` json
{
"id": "9632d033-b25d-47c0-8aa9-85babec64969"
}
```
The returned `id` represents the userId of the newly created anybill user. Store this ID in your existing user model and use it to request authentication token for the anybill frontend sdks in your frontend application using the [token endpoint.](https://partner-platform.anybill.de/api/swagger/index.html#/User/get_v3_user__userId__token)
### Retrieving token information for an anybill account
This is the legacy `GET` variant, kept for backwards compatibility. New integrations should use the `POST /v3/user/token` endpoint described above, which also supports `externalId`.
To authenticate an anybill user within the anybill SDK in your frontend application, retrieve token information using the anybill `userId` that was returned during user creation. The token should then be forwarded to your frontend application and used to initialize the anybill SDK.
**Request:**
userId: anybill userId obtained during user creation
applicationClientId (optional): Client-Id of your frontend application which is requesting the token
```json
GET api/v3/user/{userId}/token?applicationClientId={applicationClientId}
```
> **Tip: Multiple frontend application**
>
> If you are handling multiple frontend applications with one Partner Platform API integration, setting the applicationClientId is essential to differ between the requesting frontend applications. This is useful for error handling, data analysis and to return different data between your applications (e.g. stores).
>
**Response Body:**
```json
{
"id": "3fa85f64-5717-4562-b3fc-2c963f66afa6",
"accessToken": "string",
"refreshToken": "string",
"expiresIn": "string"
}
```
accessToken: Token information which should be forwarded to the frontend application
refreshToken: Token information which should be forwarded to the frontend application
expiresIn: Token information which should be forwarded to the frontend application
:::
### Deleting an anonymous account
If your anybill account is not needed anymore you can delete it using the `DELETE /api/user/{userId}` [endpoint](https://partner-platform.anybill.de/api/swagger/index.html#/User/delete_v3_user__userId_).
## Onboarding Endpoints
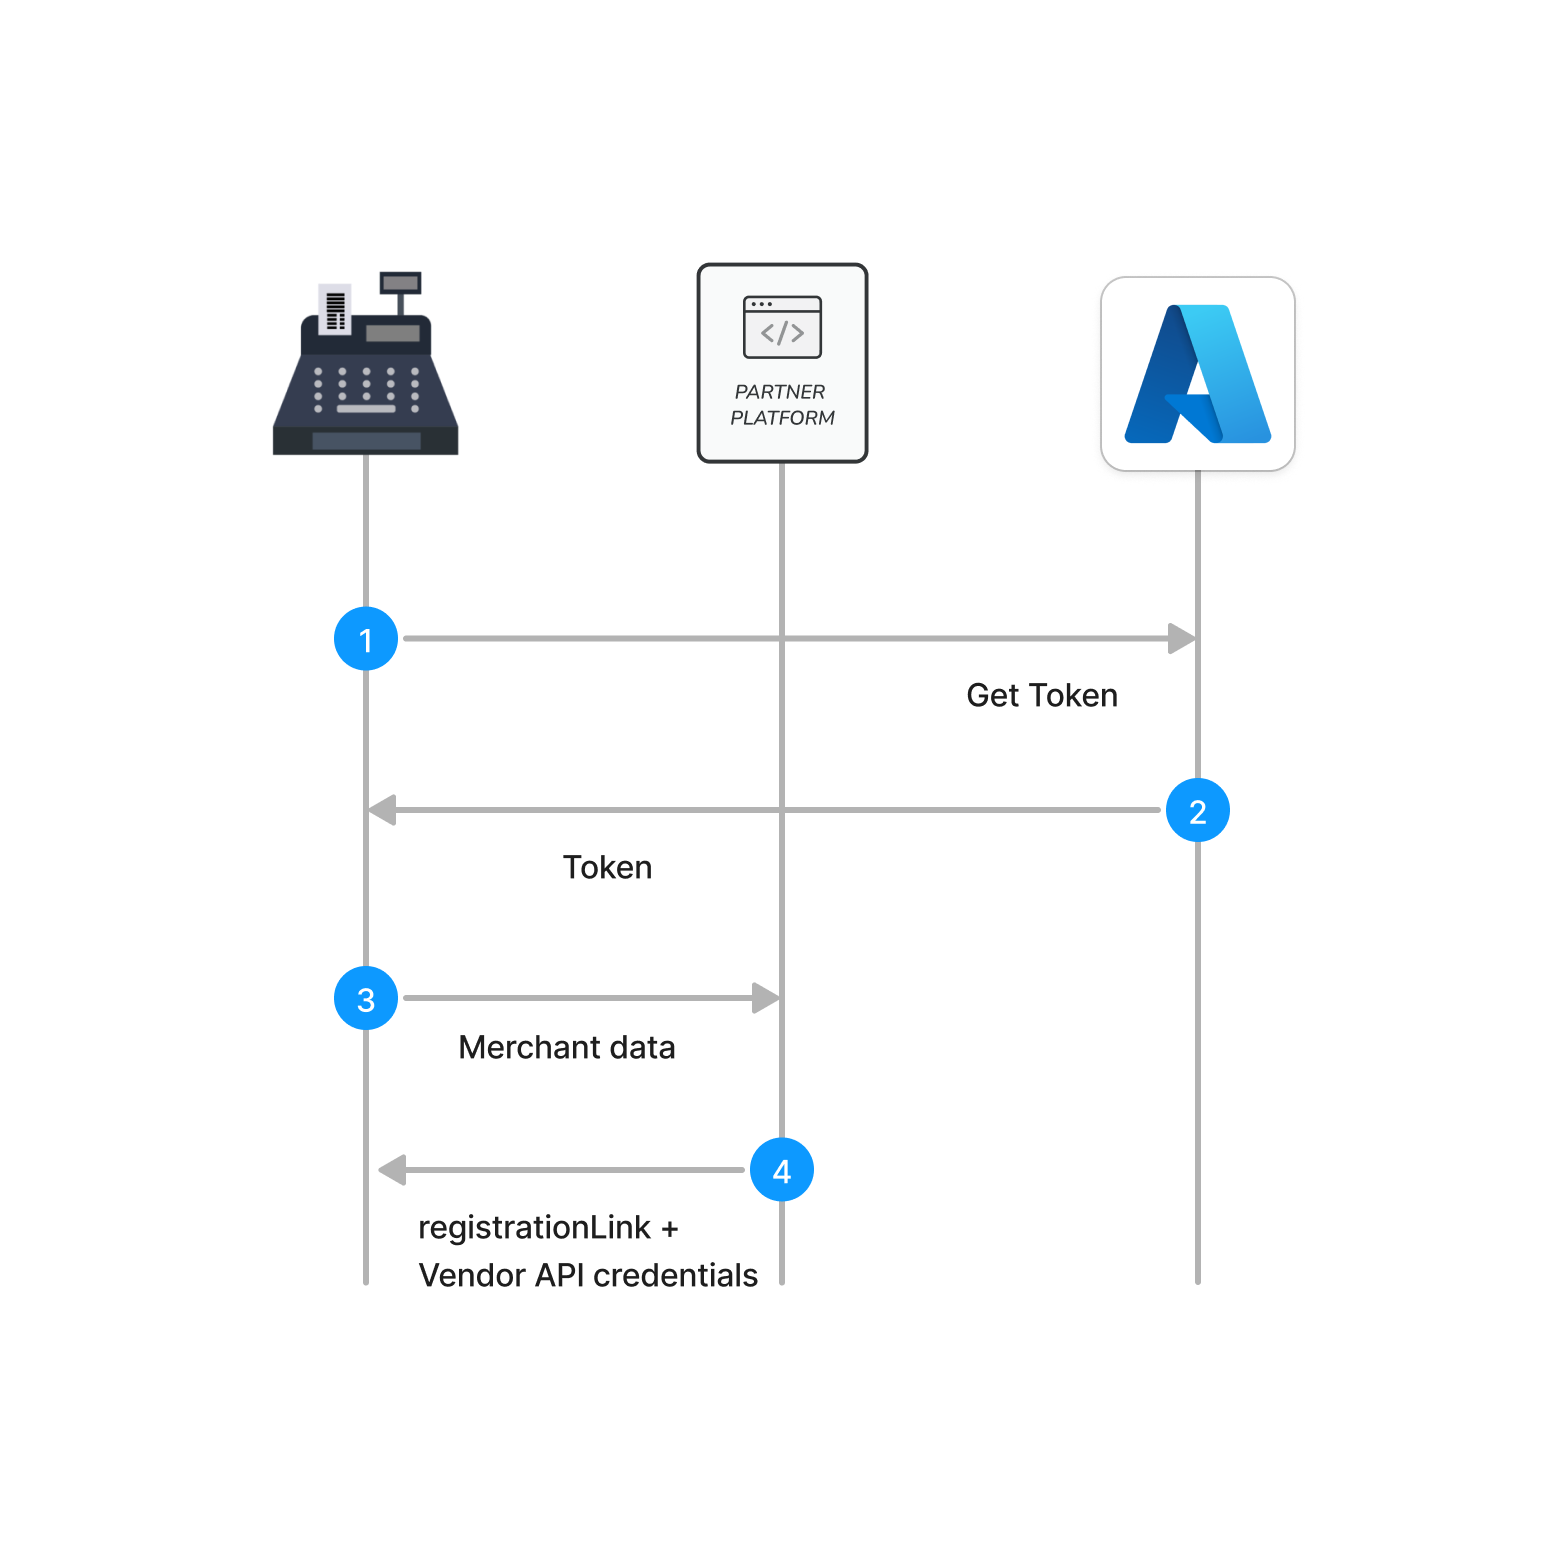
anybill provides the possibility to automatically onboard a merchant, by generating Vendor API credentials and a merchant account based on the provided merchant information. Automatic onboarding can either be used from a server client containing merchant information or directly from the POS.
The onboarding controller contains two endpoints which can be used to create a new customer as a POS provider and check the current status of the customer.
### Onboarding a merchant
- POST `onboarding` Send master data to the anybill system for automatic onboarding
```json
{
"vendorCustomer": {
// Information about the merchant
},
"stores": [
// Information about the stores of the merchant (Optional)
],
"invoicingDetails": {
// Information about the prefered invoicing of the merchant
}
}
```
### Onboarding from a server client
If your merchant data (address, name, stores, billing) is stored in an available cloud system, the merchant can be enrolled by your backend using the server client variant. This way the merchant is enrolled by providing all necessary data. Your system is going to receive a registration link for the merchant and Vendor API credentials which have to be forwarded to the POS (automatically or manual).
 ### Onboarding directly from the POS
If your merchant data isn't available beforehand (e.g. when merchants set up their POS system themselves) the Onboarding Endpoint can also be called direclty from the POS during initial setup (or initial activation of digital receipts). This way the registration link can be directly displayed on the POS and the received credentials can be stored withing the POS.
### Onboarding directly from the POS
If your merchant data isn't available beforehand (e.g. when merchants set up their POS system themselves) the Onboarding Endpoint can also be called direclty from the POS during initial setup (or initial activation of digital receipts). This way the registration link can be directly displayed on the POS and the received credentials can be stored withing the POS.
 > **Tip: Enrolling stores automatically**
>
> This endpoint can be used either from a server client containing all the merchant and store information or directly from a POS. Calling it from a POS without information about other stores requires integration of the store endpoint of the [Vendor API](https://developers.anybill.de/vendor_api/api_vendor.html#store-endpoints).
>
### Check customer's onboarding status
- GET `onboarding/vendorCustomerId/{vendorCustomerId}` Customer is activated
- If the customer finished the onboarding successfull, the HTTP status code `200 Ok` is returned with a `CustomerActivatedDto` response.
``` json
{
"type": "activated",
"customerId": "3fa85f64-5717-4562-b3fc-2c963f66afa6"
}
```
- If the customer did not finish the onboarding, the HTTP status code `200 Ok` is returned with a `CustomerNotActivatedDto` response. This means that the customer can not send receipts via the bill endpoints.
``` json
{
"type": "notActivated",
"customerId": "3fa85f64-5717-4562-b3fc-2c963f66afa6"
}
```
#### Detailed Endpoint Description
- For Staging Environment: [SwaggerUI](https://partner-platform.stg.anybill.de/api/swagger/index.html#/Onboarding)
- For Production Environment: [SwaggerUI](https://partner-platform.anybill.de/api/swagger/index.html#/Onboarding)
## Receipt Endpoints
Additionally to the creation of anybill users and the enabling of receipt by loyality card the Partner Platform API provides endpoints to query user receipts and export them as PDF. We recommend these endpoints for customers in combination with the [receipt notitication webhook](../webhooks/receipt_notification.md)) and costumers without the possibility to integrate the anybill SDK.
> **Tip: Enrolling stores automatically**
>
> This endpoint can be used either from a server client containing all the merchant and store information or directly from a POS. Calling it from a POS without information about other stores requires integration of the store endpoint of the [Vendor API](https://developers.anybill.de/vendor_api/api_vendor.html#store-endpoints).
>
### Check customer's onboarding status
- GET `onboarding/vendorCustomerId/{vendorCustomerId}` Customer is activated
- If the customer finished the onboarding successfull, the HTTP status code `200 Ok` is returned with a `CustomerActivatedDto` response.
``` json
{
"type": "activated",
"customerId": "3fa85f64-5717-4562-b3fc-2c963f66afa6"
}
```
- If the customer did not finish the onboarding, the HTTP status code `200 Ok` is returned with a `CustomerNotActivatedDto` response. This means that the customer can not send receipts via the bill endpoints.
``` json
{
"type": "notActivated",
"customerId": "3fa85f64-5717-4562-b3fc-2c963f66afa6"
}
```
#### Detailed Endpoint Description
- For Staging Environment: [SwaggerUI](https://partner-platform.stg.anybill.de/api/swagger/index.html#/Onboarding)
- For Production Environment: [SwaggerUI](https://partner-platform.anybill.de/api/swagger/index.html#/Onboarding)
## Receipt Endpoints
Additionally to the creation of anybill users and the enabling of receipt by loyality card the Partner Platform API provides endpoints to query user receipts and export them as PDF. We recommend these endpoints for customers in combination with the [receipt notitication webhook](../webhooks/receipt_notification.md)) and costumers without the possibility to integrate the anybill SDK.
> **Warning: Receipt Data**
>
> The Partner Platform API endpoints provide a reduces receipts model with relevant data to be displayed in a receipt list in a frontend application. For detailed receipt information or additional features, the anybill SDK has to be integrated in frontend applications.
>
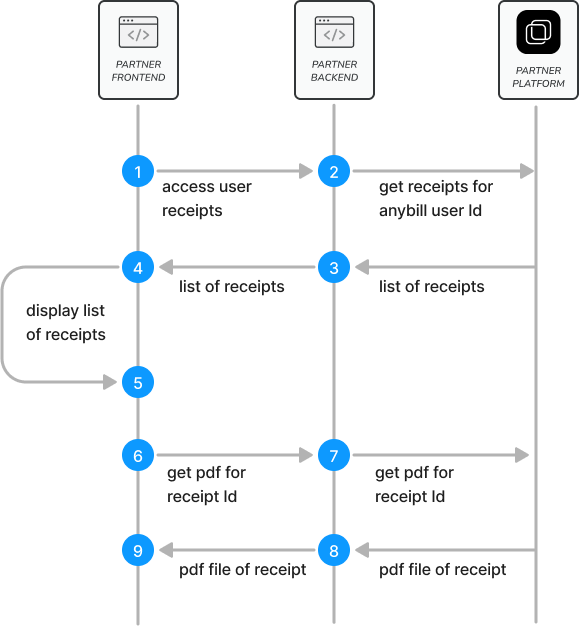
### Retrieve list of receipts for user
The receipt retrieval endpoints offer two seperate ways to retrieve receipts.
**Additional API access in combination with the Frontend SDK**
These endpoints are based on the user Id which is returned during the user creation of anybill users. If you have a anybill Frontend SDK in one of your frontend application, these endpoints provide you additional access to the receipts of your user, allow you to query the receipt pdf and add another anonymous receipt. The receipt endpoint returns a list of reciept for a specific anybill user, to be displayed in a paginated list in the frontend application or consumed somewhere else in your system. To register an anybill account use the [user endpoints](#user-endpoints).
#### Request Parameters
| Parameter Name | Value |
|---------------------|------------------------|
| `userId` | `` |
| `take` | `100` |
| `continuation` | `` |
#### Response Headers
| Header Name | Value |
|---------------------|------------------------|
| `Total-Count` | `35` |
| `ContinuationToken` | `` |
If the amount of receipts of the user exceed the page size ("take" parameter) a continuation token is returned in the Headers of the response. Use this continuation token in the following request to query the next page of receipts.
#### Response Example
```json
[
{
"receiptId": "bc5085a0-4b14-4cac-8ae3-c5561e7c76ae",
"storeId": "ea29b33a-21a6-4276-b330-415c806b87a2",
"amount": 150.0,
"currency": "EUR",
"date": "2024-02-27T16:18:14.5849630+01:00",
"imageResource": "https://anybillqa.blob.core.windows.net/stores/49fe5cae-cf28-4cbb-84bc-a1c5551d9f12.png",
"vendorName": "Lieblingsladen",
"vendorAddress": {
"street": "Sandstraße 33",
"city": "München",
"postalCode": "80335",
"countryCode": "DEU"
}
},
{
"receiptId": "2de34445-c2fe-4829-8768-48e91224ea47",
"storeId": "ea29b33a-21a6-4276-b330-415c806b87a2",
"amount": 22.52,
"currency": "EUR",
"date": "2024-02-29T15:55:20.5567630+01:00",
"imageResource": null,
"vendorName": "Bäckerei",
"vendorAddress": {
"street": "Franz Mayer Straße 1",
"city": "Regensburg",
"postalCode": "93053",
"countryCode": "Deutschland"
}
}
]
```
### Generate PDF File for receipt
To access the original receipt as PDF file call the PDF generation endpoint using a receiptId and the corresponding userId:
#### Request Parameters
| Parameter Name | Value |
|---------------------|------------------------|
| `userId` | `` |
| `receiptId` | `` |
### Add anonymous receipt to user
To enable the acquisition of frontend users through digital receipts anybill provides the possibility to link out into frontend apps from the receipt retrieval website. During the link out the receiptId of the receipt is forwarded to your frontend application and can be used to add the receipt to an registered anybill user.
> **Tip: user registration**
>
> Before being able to add an anonymous receipt, the anybill user has to be registered using the [user endpoints](#user-endpoints).
>
#### Example Request
| Parameter Name | Value |
|---------------------|------------------------|
| `userId` | `` |
```json
{
"receiptId": "bc5085a0-4b14-4cac-8ae3-c5561e7c76ae",
}
```
#### Example Response
```json
"bc5085a0-4b14-4cac-8ae3-c5561e7c76ae"
```
### Retrieve receipts via externalId (without Frontend SDK)
If you don’t use the anybill Frontend SDK and don’t want to create users within your system, you can still query receipts directly based on external identifiers. This allows you to retrieve receipts for a known identifier from your system (e.g., `customerId`, `cardNumber`) that has been attached during receipt creation.
The endpoint returns a **paginated list of receipts** associated with the provided external identifier. Pagination is controlled via the `take` parameter (max. 100). If more results are available, a `ContinuationToken` is included in the response headers and must be passed in the next request.
#### Endpoint
`GET /v3/user/receipt/list`
#### Request Parameters
| Parameter Name | Value |
|----------------------|---------------------------|
| `externalId` | `` |
| `take` | `100` (default, max 100) |
| `continuationToken` | `` |
#### Response Headers
| Header Name | Value |
|----------------------|---------------------------|
| `MaxCount` | `350` |
| `ContinuationToken` | `` |
If the number of receipts exceeds the requested page size (`take`), use the `ContinuationToken` from the previous response to fetch the next page.
#### Response Example
```json
[
{
"receiptId": "3fa85f64-5717-4562-b3fc-2c963f66afa6",
"receiptNr": "R-2025-0001",
"storeId": "ea29b33a-21a6-4276-b330-415c806b87a2",
"externalStoreId": "STORE-123",
"amount": 45.99,
"currency": "EUR",
"date": "2025-09-05T13:48:13.660Z",
"imageResource": "https://anybill.blob.core.windows.net/stores/logo.png",
"vendorName": "Supermarkt",
"vendorAddress": {
"street": "Hauptstraße 1",
"city": "Berlin",
"postalCode": "10115",
"countryCode": "DEU"
}
}
]
```
#### Empty Result
If no receipts are found for the given `externalId` or the continuationtoken returns no further results, the endpoint responds with status `204 No Content`.
### Download receipt PDF via externalId
This endpoint allows you to retrieve the legally required **PDF version of a receipt** by combining an `externalId` with a specific `receiptId`.
#### Endpoint
`POST /v3/user/receipt/{receiptId}/pdf`
#### Request Parameters
| Parameter Name | Value |
|----------------------|---------------------------|
| `externalId` (query) | `` |
| `receiptId` (path) | `` (required) |
#### Response
| Code | Description |
|------|--------------------------------------------|
| 200 | Returns the PDF file (`application/pdf`) |
The response contains the raw PDF file as binary content. Clients should handle the response as a downloadable file.
### Scopes & Permissions
The `externalId`-based receipt endpoints above (`GET /v3/user/receipt/list` and `POST /v3/user/receipt/{receiptId}/pdf`) require the following scopes and permissions:
**Scopes:**
- `user`
- `receipt`
### Detailed Endpoint Description
- For Staging Environment: [SwaggerUI](https://partner-platform.stg.anybill.de/api/swagger/index.html#/Receipt)
- For Production Environment: [SwaggerUI](https://partner-platform.anybill.de/api/swagger/index.html#/Receipt)